Getting started with Expenses
Maatdesk allows you to manage expenses and then bill clients efficiently and quickly.
In this tutorial, you will learn the basic steps to work with Expenses.
Table of contents
Creating an Expense entry
To start creating an expense entry, do one of the following:
- Click the Add Expense button in the Activities window or the Activities tab of a Matter dashboard.

- In the Matters window or the Matters tab of a Contact dashboard, at the beginning of the matter row in the table:
- Click the action selector next to the Edit (
 ) button.
- Click the Add Expense button.
- Click the action selector next to the Edit (
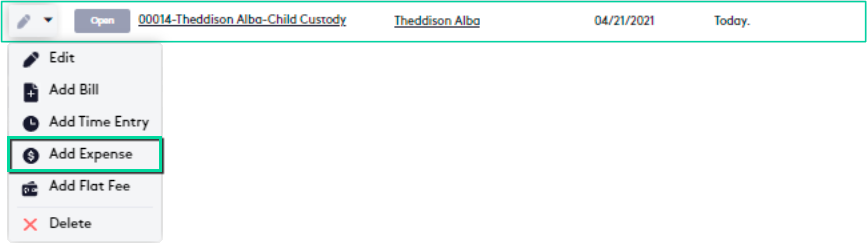
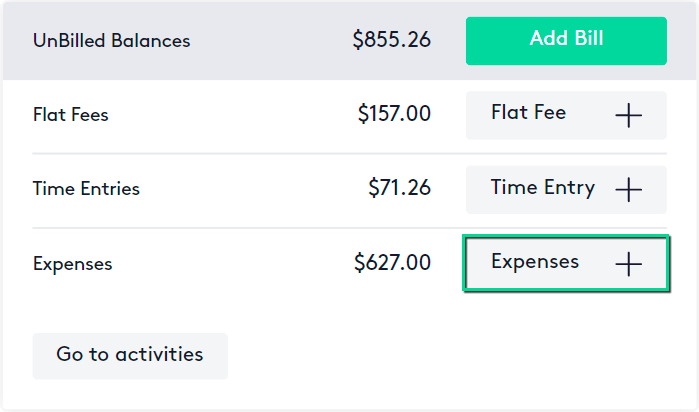
- Click the Expenses button in the Financial widget of a Matter dashboard.
Adding an expense entry from the Add Expense Entry panel
In the Add Expense Entry panel, fill in or change the fields as follows:
- Amount: This field is filled when selecting an Activity Category with the Amount defined in it, you can modify this value if necessary.
- Matter: Select a matter to associate with the expense.
If the expense is to be created directly from a matter, this field cannot be modified.
- Activity Category: Select a category to classify the expense and also be able to bill it.
If the expense category is not listed, it must be created first.
- User: Select the user who will bill the activity.
- Date: Change the creation date of the expense entry if necessary, by default it will be the current date.
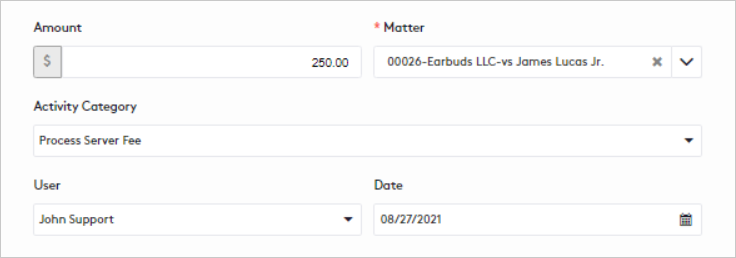
- Description: Write a short note describing the reason for the expense.
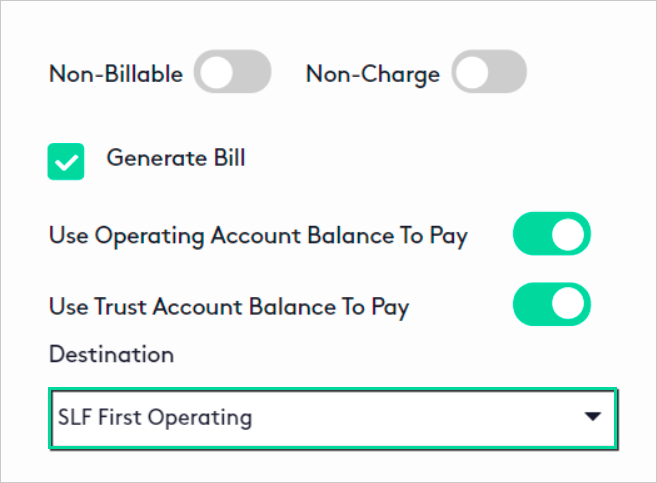
- Non-Billable: Check if invoices will not be generated for the expense.
This option will be checked by default if the selected matter is not billable.
- Non-Charge: Check this option if the expense will not be charged to the client.
- This option is available only if the Non-Billable option is not checked.
- With this option, the entry is shown on an invoice, but the balance due will not be available and taxes will not be applied.

- Generate Bill: Check this option to automatically generate a bill when saving the entry.
- This option is available only if the Non-billable option is not checked.
- Note that doing this will create the expense in the Billed state and the invoice in the Awaiting Payment state, both cannot be edited or deleted.
To pay the bill on the spot, you can select one or both of the options:
- Use Operating Account Balance To Pay.
- Use Trust Account Balance To Pay.

The order to make the payment will be as follows:
- Maatdesk will attempt to use Available Matter Funds in Operating Accounts to cover the invoice balance.
- Maatdesk will attempt to use Available Client Funds in Operating Accounts to cover the invoice balance.
- Maatdesk will attempt to use Available Matter Funds in Trust Accounts to cover the invoice balance.
- Maatdesk will attempt to use Available Client Funds in Trust Accounts to cover the invoice balance.
After trying to cover the invoice balance:
- If the balance is fully or partially covered, Maatdesk will record the payment.
- If the balance was not covered or there are pending payments, they must be recorded manually when the client makes them.
If at least one of the payment options is checked:
- Destination: Select an account to deposit the funds, only Operating Accounts will be displayed.
When you are done, you can Save or Save And Add Another entry and fill in or change the fields as described above.
Note that this last option will be available only if a bill is not generated for the expense.
If the Non-billable and Generate Bill options were unchecked when creating the expense:
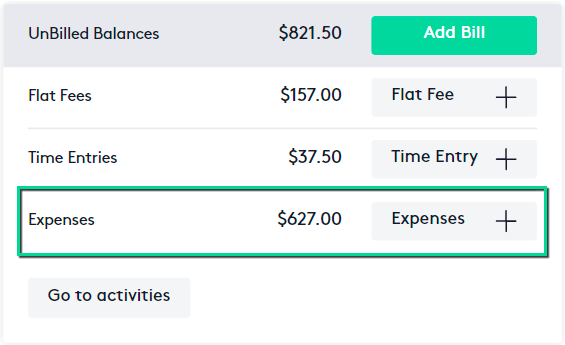
- The expense entry is saved in the Unbilled status.
- The balance of Expenses is updated in the Financial widget of the selected matter.
Adding an expense entry from a Quick Bill
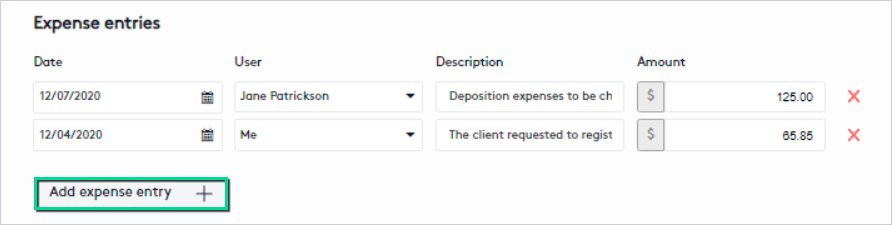
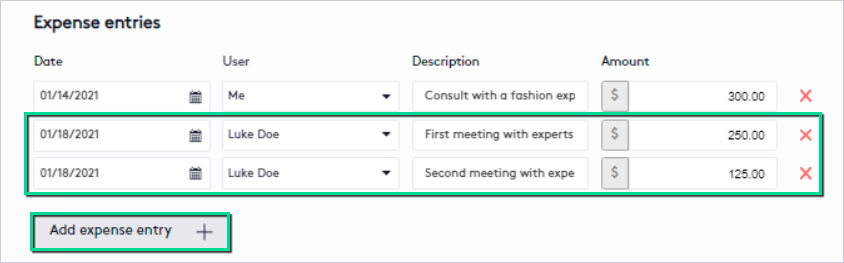
You can create as many expense entries as you need directly from a bill you are creating or editing, just keep the following items in mind:
- The fields displayed will be filled in or changed in the same way as described in the Adding an expense entry from the Add Expense Entry panel section, except for the Amount, which must be set manually.
- For expense entries created in this way, activity categories cannot be assigned, nor can they be set to Non-Charge.
- Expense entries will be saved after saving the Quick Bill. They will do it in the Billed state and can only be edited by editing the invoice if it is in Draft state.
Editing an Expense entry
To start editing an expense entry, do one of the following:
- In the Activities window or the Activities tab of a Matter dashboard, at the beginning of the expense entry row in the table, use one of these options:
- Click the Edit () button.
- Click the action selector and then click the Edit (
 ) button.
- Click the Edit (

- Create a Quick Bill or access to edit one containing the expense entry to edit.
Either from the Edit Expense Entry panel or from a Quick Bill, modify the fields you need as described in the sections:
Before editing an expense entry, consider the following items:
- Expenses for Closed matters cannot be edited.
- Expense entries in the Billed status cannot be edited directly. You can only do this by editing the Draft invoices that contain them.
- If an expense entry is edited from the Activities tab of a Matter dashboard, the Matter field cannot be modified.
- If the Activity Category field changes, the Amount will also change and can be overwritten if necessary.
- If an expense entry is edited from a Quick Bill, the Amount field must be changed manually, as activity categories cannot be assigned.
- If an expense entry is edited from a Quick Bill, it will be updated only when the invoice is saved.
Deleting an Expense entry
To delete an expense entry:
- Go to the Activities window or the Activities tab of a Matter dashboard.
- Click the action selector next to the Edit () button at the beginning of the expense entry row in the table.
- Click the Delete (
 ) button.

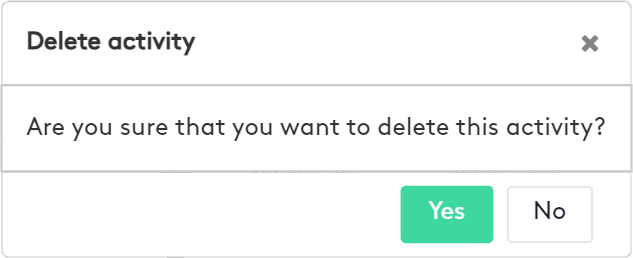
- In the modal that is displayed, click Yes to confirm the action.
Before attempting to delete an expense entry, consider the following items:
- Expense entries can only be deleted if their status is Unbilled or Non-Billable and the matter to which they belong is not Closed.
- If an expense entry is removed from a Quick Bill, it will not be deleted from Maatdesk, this action only makes it available to be included in another.
Read the Structure of the Billable Clients tab section for more information.