Managing Participant Statuses
Efficiently tracking the standing of parties involved in your legal matters is vital for accurate reporting and workflow management. With the Participant Statuses feature, Maatdesk allows firm administrators to define the current state of individuals within a case, ensuring your team always knows where a participant stands in the legal process.
Table of contents
- Predefined Participant Statuses
- Overview of Participant Statuses
- Adding a New Participant Status
- Editing a Participant Status
- Deleting a Participant Status
- Assigning a Status to a Participant
Predefined Participant Statuses
To ensure consistency in your firm’s data, Maatdesk includes five core participant statuses by default. These statuses are essential to the system’s logic and cannot be edited or deleted:
-
Approved
-
Opt-Out
-
Paid
-
Pending
-
Rejected
These statuses provide a standardized way to track progress, especially in high-volume litigation or class-action matters.
Overview of Participant Statuses
Participant Statuses act as markers that indicate the current stage or condition of an external contact within a specific case. While Roles define who a person is, Statuses define where they are in your workflow.
To access the Participant Statuses window:
- Click the Settings icon on the left side panel.
- Click the Participant Statuses block.

This window allows you to view and manage all available statuses within the application.
Add Participant Status
If your firm requires more granular tracking (e.g., “Under Review” or “Disqualified”), you can create custom statuses.
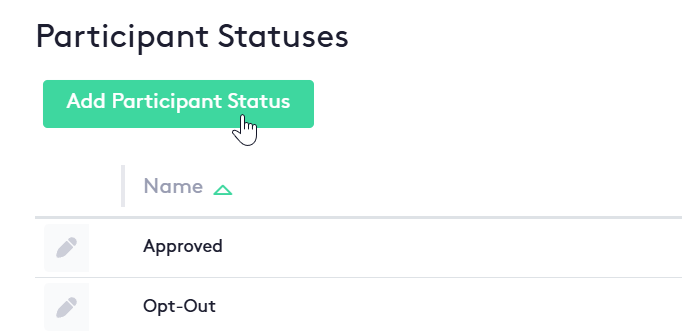
- Navigate to Settings and select Participant Statuses.
- Click the Add Participant Status button.
- Enter the name of the status.
- Select if Status is Active or not
- Save your changes to make the status available for use.
Edit Participant Status
You can update the name of any custom status at any time to better reflect your firm’s terminology.
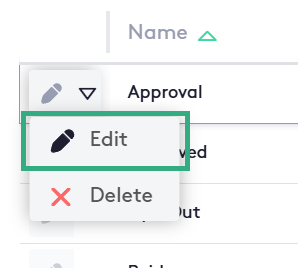
- From the Participant Statuses list, locate the custom status you wish to change.
- Click the Edit (pencil) icon.
- Update the status name and click Save.Note: Updating a status name will automatically update all participants currently assigned to that status across all matters.
Delete Participant Status
If a custom status is no longer needed, it can be removed from the system.
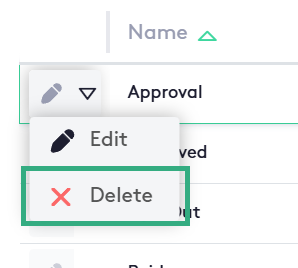
- Navigate to the Participant Statuses list
- Click the action selector located next to the Edit button at the beginning of the status row.
- Click the Delete Button
- Confirm the deletion in the pop-up window.
Assigning a Status to a Participant
Once your statuses are defined, you can apply them to people within a specific matter to keep your records up to date.

- Open a specific Matter and navigate to the Participants section.
- When adding a new participant or editing an existing one, locate the Status dropdown menu.
- Select the appropriate status (e.g., “Approved” or “Paid”).
- Click Save.