Structure of the Request Details window
This guide explains all the elements involved in a request. Through this guide, you will learn the basic concepts of the Request Details window, what elements make it up, and what actions you can perform from this window.
Table of contents
Structure of the Request Details window
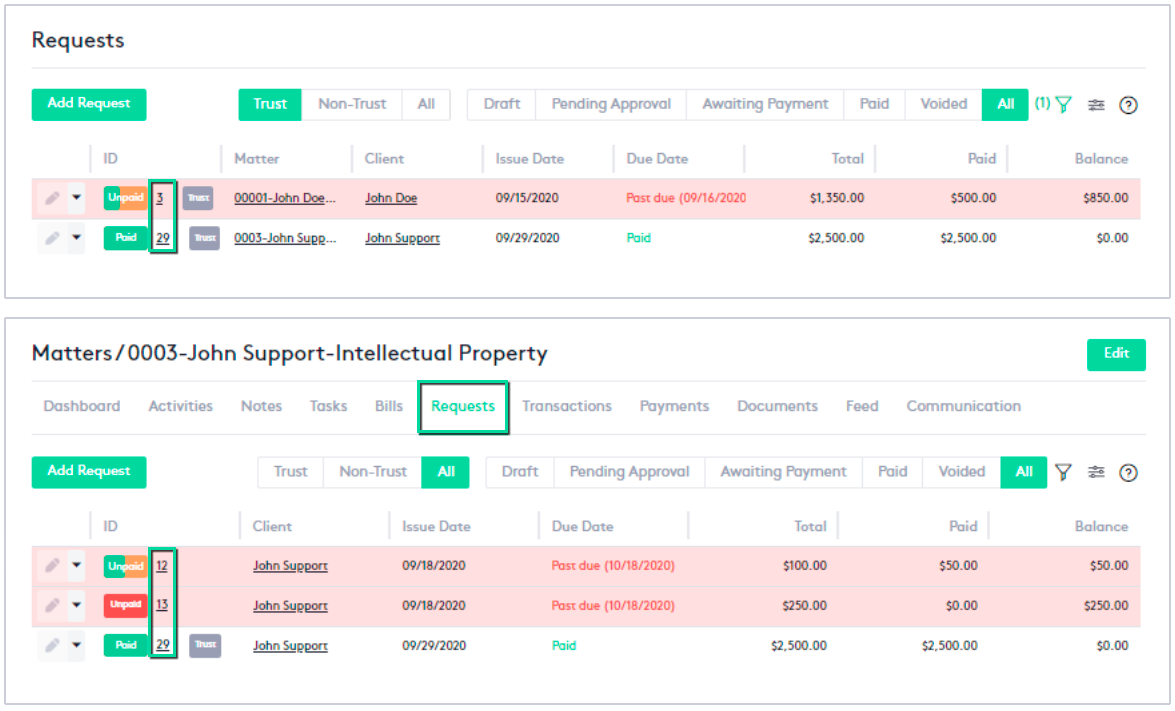
The Request Details window displays more detailed information about the request, it can be accessed by clicking on the ID or name of any request, whenever it is underlined.
The most direct way to access the Request Details window is through the request table, which provides only the main information about the requests. These tables can be found at:
- Requests window.
- Requests tab of a Matter or Contact dashboard.
The Request Details window is composed of the following elements:
- Request header: Contains the main elements and actions of a request. A more complete description of each element is shown below:

- Request number: Contains “Before” and “After” arrows to navigate between requests, request number, and current status.
For more information about request statuses, read the Understanding Request statuses guide.
- Action buttons:
- Status or “Actions” selector: Allows you to switch between the status of the requests.
This selector will be available only if the current request status allows to change to another.
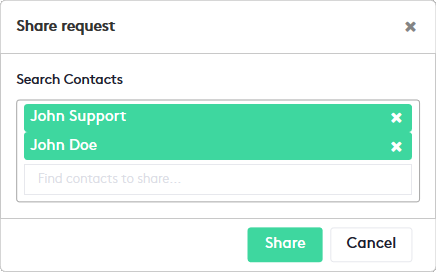
- Share button: Allows you to share the request with contacts within Maatdesk.
To share a request, click this button and when the modal is displayed:
- Type the names of the contacts to share, one at a time.
- As they appear, select them.
- Click the Share button.
The request will be emailed to the selected clients using the primary address provided when creating the contacts.
- Download PDF button: Exports the request, allowing you to save it to your device or open it directly as a PDF. Once open, you can click the Print button of your PDF reader or plug-in and print the generated document.
To be able to download PDF files, your browser must allow pop-ups, read these external guides for the most popular browsers:
- Edit button: This button will be enabled only if the request is in Draft status, and allows you to update the request by launching the Update Request panel.
To find out how to update the request, read the tutorial Getting started with Requests.
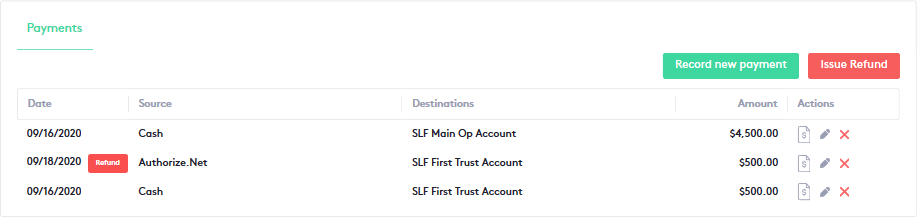
- Payment details: This block provides information about the payments made for the requests and the refunds of those payments, and contains two main buttons:
- Record payment: Available only if the request is in the Approved status, this button allows you to record a new payment for the request.
To learn how to record a payment, read the tutorial Getting started with Payments.
- Issue refund: This button allows you to issue a refund of the amount of the request payments and will be available only if:
- The request is Non-Trust.
- There is at least one payment made.
- The request is in Approved or Paid status.
To learn how to issue a refund, read the tutorial Issuing a Refund.
- This block also contains the action buttons to get a payment or refund receipt (
 ), edit (
 ), and delete (
 ) the payment or refund.
 These last two actions can only be performed if the request is in the Approved or Paid status.
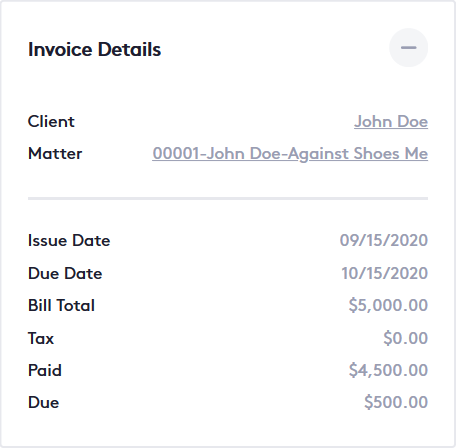
- Invoice details: This block provides basic information about the request.
Client and matter names are elements that, when clicked, redirect to the respective Contact or Matter dashboard.
The “reduce” icon (
 ) on the right side allows compacting the block. Once compacted, the “expand” icon (
 ) will be displayed to perform the opposite action.
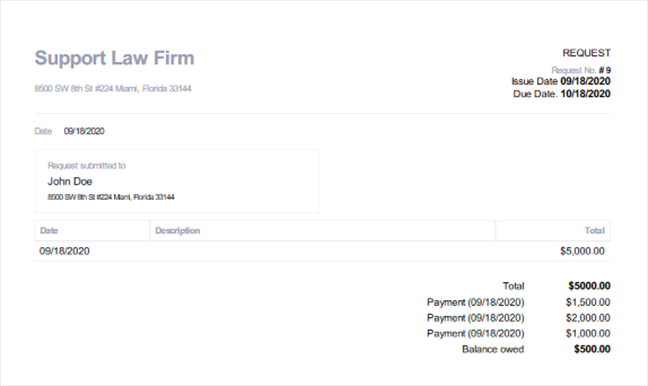
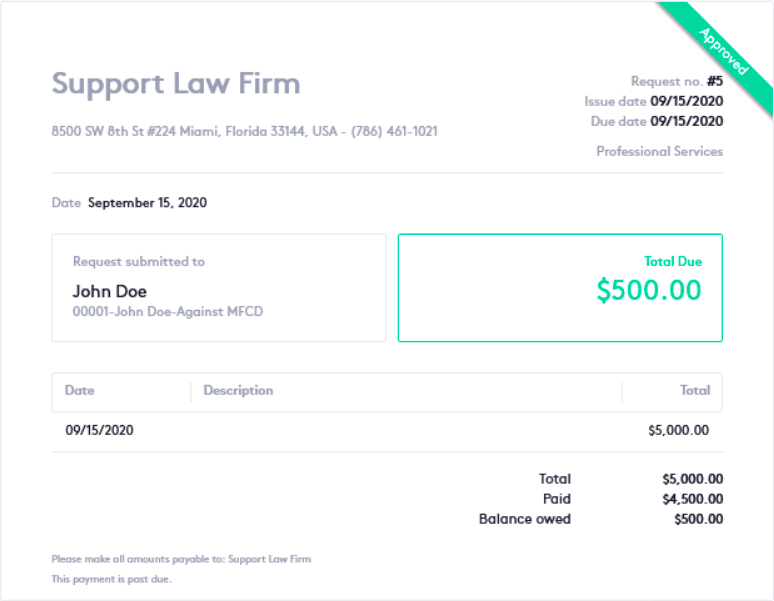
- Request sheet: Provides more detailed information about the request:
- Firm name and address.
- Status of the request.
- Request number and issue and due dates.
- Date of creation of the request.
- Name and address of the client to whom the request will be submitted.
- Total due: Shows how much the client still has to pay or is overpaying.
- Issue date, description, and the total amount of the request.
- Below all these elements will be the summary of operations of the request: the total that must be paid, how much has been paid, and the balance owed.
- And finally, there is a footer that will inform who should be paid all the amounts (the firm) and the limit of days to make the payment (in working days).
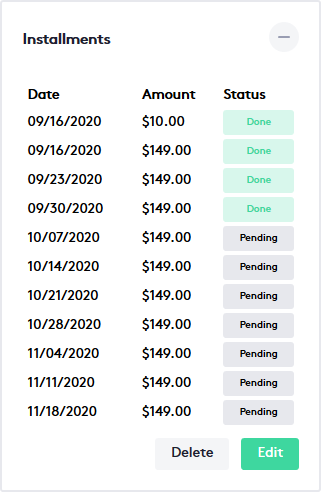
- Installments: This block, if available, shows the installments of an implemented payment plan and:
- Provides information on all the request installments (payment date, amount to pay, and installment status).
- Contains the buttons to Edit or Delete the payment plan.
If there is no payment plan created, a button will be displayed to create a new one, which will be visible only if the request is in the Approved status.
The “reduce” icon (
) on the right side allows compacting the block. Once compacted, the “expand” icon () will be displayed to perform the opposite action.It is recommended that you read the following guides for more information: