
The Bank Deposits module groups payments you received, such as checks and cash, into a deposit that matches the deposit slip you take to the bank, so your records line up with your bank statement.
Table of contents
The Bank Deposits list
- In the left menu, click Bank Deposits.
- New Deposit creates a deposit.
- The list shows each deposit’s Number, Date, Reference, Account, Description, Items, Amount and Status. Use the filter button to search the list.
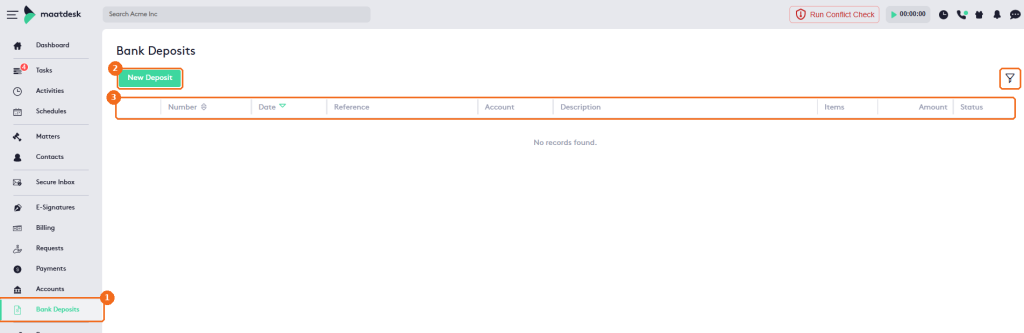
The deposits of each account also appear in the account’s Deposits tab, which has its own New Deposit button.
Create a deposit
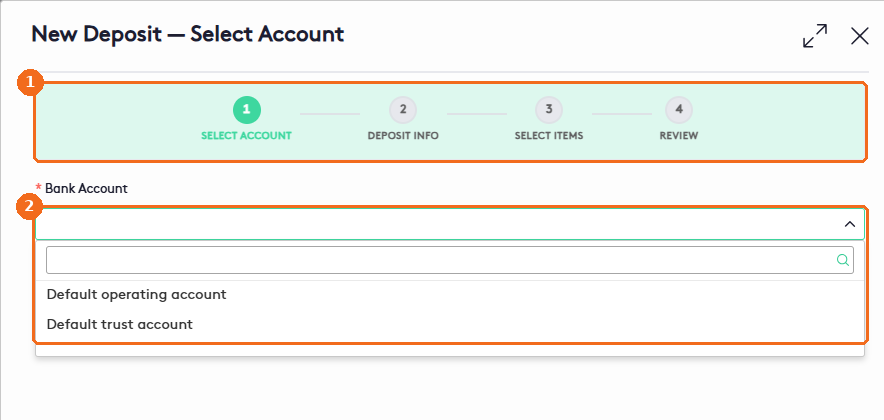
Click New Deposit. The New Deposit panel has four steps.
Step 1: Select Account
- The steps at the top show where you are: Select Account, Deposit Info, Select Items and Review.
- In Bank Account, select the account the deposit goes to, then click Next.
Step 2: Deposit Info
- Check the Deposit Date (required). It’s today by default.
- Optionally, enter the Reference #, for example the deposit slip number, and a Description.
- Click Next.

Step 3: Select Items
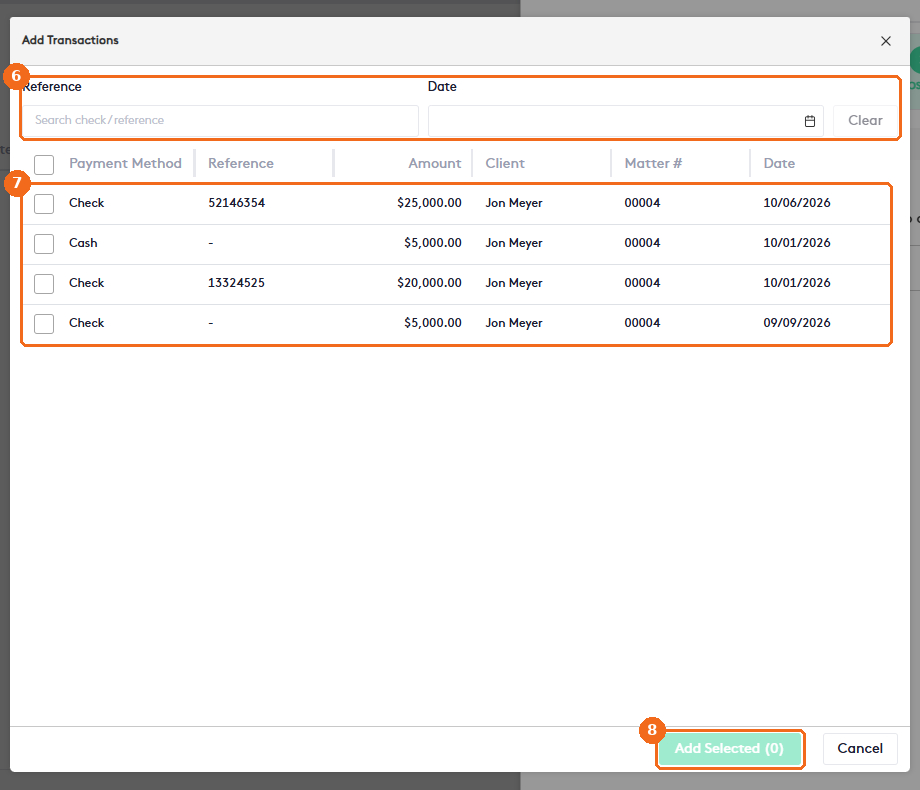
- Click Add Transaction. The Add Transactions window lists the undeposited payments of the account that were recorded with the Check or Cash payment method, from any client or matter. Use Reference and Date to find them, or Clear to reset the filters.
- Select the transactions included in the deposit. One deposit can combine payments from different clients and matters.
- Click Add Selected. The button shows how many transactions you selected.
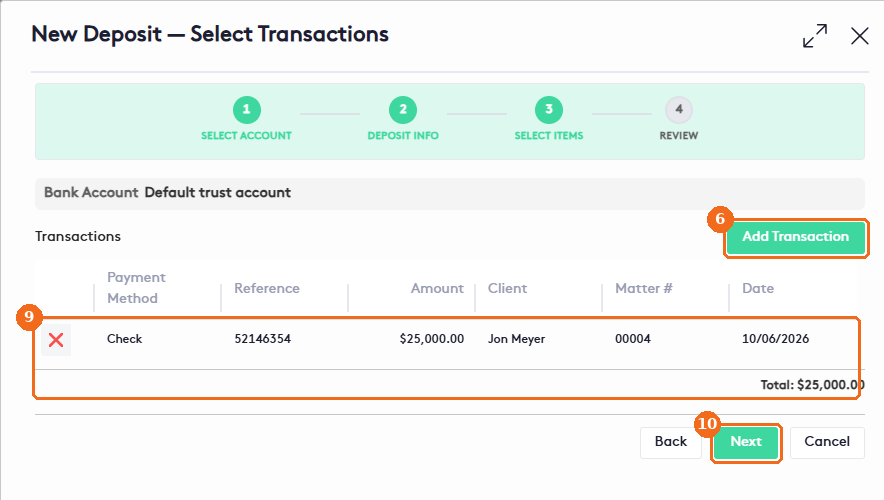
- Check the selected transactions and the Total. To remove a transaction, click the X at the start of its row.
- Click Next.
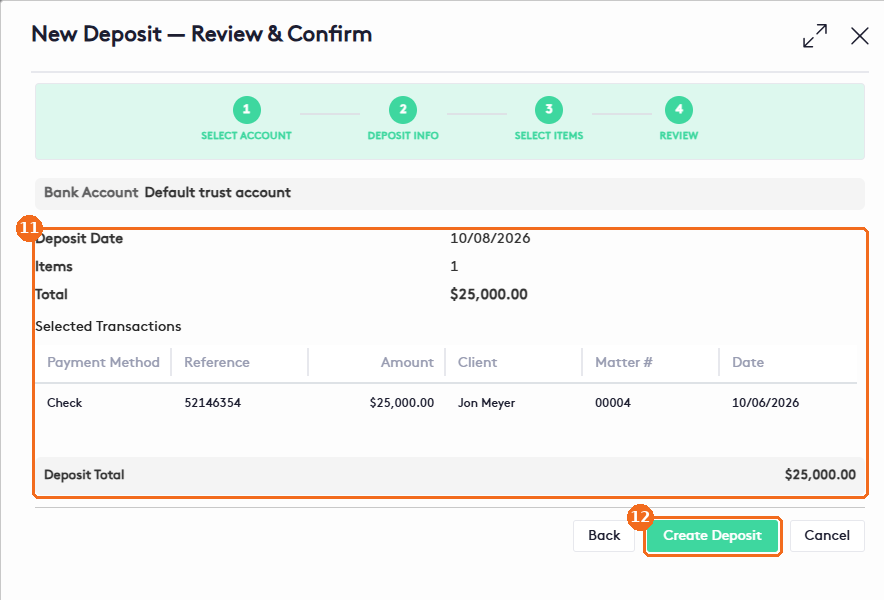
Step 4: Review
- Review the Deposit Date, the number of Items, the Selected Transactions and the Deposit Total. It should match your deposit slip. Click Back to make changes.
- Click Create Deposit. The message Deposit created successfully appears.
The deposit gets a number (for example DEP-000001) and appears, with the status Draft, in the Bank Deposits list and in the account’s Deposits tab.
Deposit statuses
Use the Status filter to show deposits by status:
| Status | What it means |
|---|---|
| Draft | The deposit is created but not posted. You can still edit or delete it. |
| Posted | The deposit items are locked and the total is calculated. You can only view it, print its report or unpost it. |
| Matched | The deposit was matched to the bank statement during the trust reconciliation. |
| Voided | The deposit was voided. |
Post, unpost and print a deposit
- In the Bank Deposits list, click the arrow of a Draft deposit. The menu has View, Report, Post, Void and Delete. The deposit panel has Edit, Post Deposit, Delete and Void Deposit.
- Select Post. The app warns: “This will lock the deposit items and calculate the total.” Confirm, and the message Deposit posted successfully appears.
- To change a posted deposit, select Unpost in its menu, or click Unpost Deposit in its panel. The deposit returns to Draft.
- To print a deposit, select Report. In the Deposit Report panel, keep the Deposit Report template and click Show report. The PDF opens in a new tab.
The deposit panel shows the Account, Date, Reference, Description, Total Amount, Items and Status, and a Deposit Items table with the Check #, Amount, Date and Client of each item.
Warning. You can’t post or unpost a deposit when its date or its items fall in a finalized reconciliation period. The app shows an error saying the date is locked by the finalized reconciliation period.
Note. Posting a deposit doesn’t clear its transactions: they keep their pending status and have no Cleared Date until you reconcile the account. See Getting started with Trust Reconciliation.